
Proxmox VE is a phenomenal open-source virtualization platform that many of us (myself included) absolutely love. It’s powered by a strong community, and the fact that we can use it for free in our home labs or even in small production environments is a huge blessing.
In my early days with Proxmox, I struggled a bit with its firewall configuration. Then I took some time to learn how it’s laid out, and the entire system started to make sense.
In this post, I’d like to share a visual and conceptual explanation of how the Proxmox firewall works across three distinct layers: Datacenter, Node, and VM (or Container, also known as CT).

Overview of the firewall architecture
Proxmox’s firewall is layered by design, which allows administrators to apply security rules at different scopes:
- Datacenter level
- Node level
- VM/Container level
Each level can inherit rules from the one above, or override them when more specific control is needed.
1. Datacenter level firewall
The Datacenter-level firewall is where you establish broad, global rules. These rules automatically apply to all nodes and VMs in your Proxmox datacenter unless explicitly overridden.
- Highest (global) scope: any rule you place here affects every node and virtual machine under that datacenter.
- Inheritance: lower levels (nodes, VMs) inherit these rules if there are no custom overrides on their respective levels.
- Default state: the datacenter firewall is disabled by default. You’ll have to enable it in the Proxmox web interface if you want to use it.
- Use cases: good for rules that apply everywhere – such as blocking inbound traffic from certain IP blocks or universally allowing DNS services.
Think of the datacenter firewall as the first umbrella of protection, setting the overall security baseline for your entire Proxmox environment.
2. Node level firewall
The Node-level firewall applies rules specifically to a single physical Proxmox host (node). In a cluster with multiple nodes, you might have different security needs for each host. In my case, there’s only one physical “homelab” node.
- Node-specific scope: rules here only impact the selected node, not any others.
However, if your setup is also just 1 node, it’s not that different from the Datacenter level. - Inheritance: node-level rules can refine or override the broader datacenter-level rules. VMs on this node can still inherit from here unless the VM itself has more specific rules.
- Use cases: while I never used node-level rules, common examples include controlling traffic between nodes in a cluster, restricting SSH access to certain IP ranges, or fine-tuning which services can be accessed on a particular host.
Node-level firewall is where you tailor the firewall for the physical server’s unique network/security requirements.
3. VM (or container) level firewall
Lastly, the VM-level firewall offers the finest granularity, applying rules only to an individual virtual machine or container (CT).
- VM-specific scope: rules here affect only the particular VM or container you configure.
- Override: VM-level rules can override both the node-level and datacenter-level settings if needed.
- Use cases: when you need to lock down a single VM. For instance, you might allow only HTTP (port 80) or HTTPS (port 443) on a web server, while blocking everything else.
This level is perfect for per-service or per-application firewalls, ensuring only the intended traffic reaches each workload.

How the Proxmox firewall operates in practice
- Rule inheritance:
- Datacenter rules → inherited by all nodes and VMs.
- Node rules → override datacenter rules for that node.
- VM rules → override both node and datacenter rules for that specific virtual machine or container.
- Default deny: If you haven’t explicitly allowed a specific type of traffic, Proxmox (by default) will deny it. This “default deny” stance is great for security because it compels you to explicitly define what traffic is permitted.
- Rule matching: Proxmox evaluates rules starting from the most specific (VM) and moves upward. Once it finds a match, it applies that rule and stops looking further.
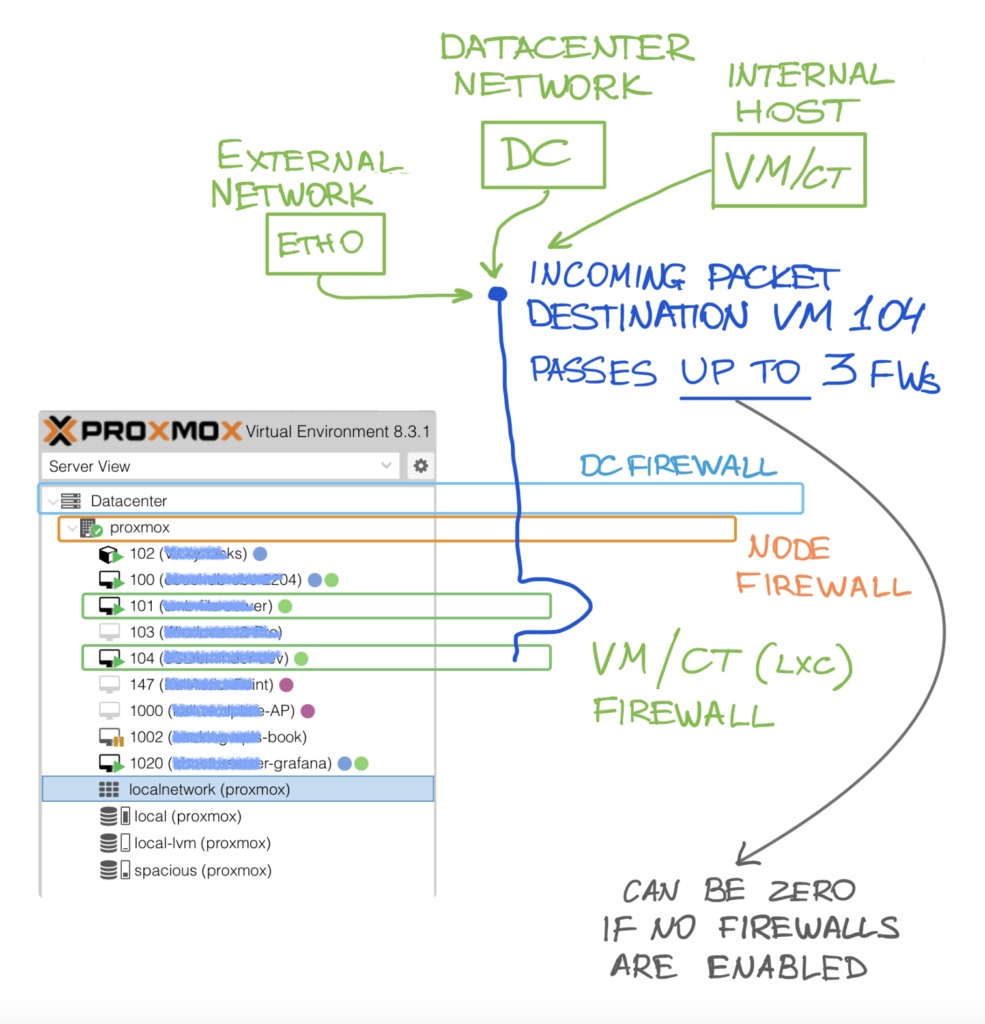
Here’s a visual representation of the three layers in action as a packet enters the system. The source of the packet may originate “on the outside,” such as from an external network, or internally, like from another VM. Additionally, depending on your system configuration, the packet may pass through zero or more firewalls.
Keep in mind that the flow below is not the same as rule matching order.
Example scenario
- At the datacenter level, you block all incoming SSH (port 22) traffic.
- At the node level for
node1, you create a rule allowing SSH. - On a VM within
node1, you add a rule to block all incoming HTTP (port 80).
Outcome:
- Datacenter-level: SSH is blocked everywhere.
- Node-level: SSH is allowed on
node1, so SSH traffic tonode1is permitted (overriding the datacenter rule). - VM-level: For the specific VM, HTTP is blocked, but SSH is not, so SSH works because the node allows it and the VM doesn’t explicitly block it.
Rule-matching order
Proxmox firewall rules are evaluated from the most specific (VM/CT level) to the least specific (Datacenter level). If a rule matches at any level, it is applied, and further evaluation stops. Here’s the evaluation flow:
- VM/CT level (most specific): Proxmox evaluates firewall rules for individual VMs or containers first. If there is a match, the packet is handled based on the rule, and no further rules are checked.
- Node level: if no match is found at the VM/CT level, Proxmox moves up to the node level (the Proxmox host). Here, the firewall rules are applied to all VMs/CTs running on that node. If a match is found, the rule is applied, and no further evaluation is needed.
- Datacenter level (least specific): finally, if no match is found at the node level, Proxmox checks the datacenter level rules. These rules are global for the entire datacenter and will apply to all nodes and VMs/CTs within that datacenter.
Once a match is found at any level, the packet is either accepted, dropped, or handled according to the rule, and evaluation stops at that point. The system does not continue to evaluate other rules once a match is found.
This behavior allows for fine-grained control over network security in a Proxmox environment, where more specific rules (e.g., for a specific VM) take precedence over broader rules (e.g., for the entire node).

Single-node Proxmox setup
Having a single-node setup, I was wondering if there’s any difference between datacenter-level and node-level rules. The answer: there’s effectively no difference – both sets of rules apply to the same single node and any VMs on that node.
For simplicity, people tend to place rules at the datacenter level in a single-node setup – this way, you only manage them in one place. You can still configure VM-level rules for fine-grained control over individual virtual machines or containers.
Conclusion

Proxmox’s firewall might seem intimidating at first, but once you understand its three-layer structure, you’ll see how flexible and powerful it really is. By leveraging inheritance, overrides, and a default deny posture, Proxmox lets us build robust, multi-layered security that caters to both broad policies and specific workload protections.
- Datacenter-level: global, baseline rules.
- Node-level: host-centric rules, refining or overriding global ones.
- VM-level: granular control for individual workloads.
Huge thank you to the Proxmox team and the community for making this powerful tool available for everyone! 🫶
If you’re setting up your homelab or looking to secure an enterprise environment, Proxmox VE’s firewall provides the layers you need for a flexible and secure virtualization platform.
Happy labbing and stay secure!